

So I saw this necklace from Anthropologie featured on Kendi Everyday, and I loved the color scheme. I love a lot of Anthropologie's jewelry, but I never buy any because of the price. However, it's ok, because a lot of their jewelry is actually not too hard to make homemade versions of. When I saw the original necklace, I knew I could make my own out of polymer clay and wire, and so I did! Sunday I got out despite my injury to go to church, lunch, and walk around the Farmer's Market just a little bit, which was really nice. I paired the necklace with this neon baseball tee that I got from Old Navy on sale a couple months ago for $2 (score!), since it was a cooler day.
My tutorial isn't totally detailed in pictures, because I didn't think to take a lot when I was doing it, so feel free to ask for clarification if you need it! I love making my own jewelry and maybe someday when I finally finish grad school and have more time on my hands, I might open an etsy shop. But for now if you're ambitious and would a version of the Anthropologie necklace for far less of the cost, here's how to do it.
What you need:
+ Polymer clay in various colors. If you want to copy the colors that I did, you'll need white, yellow, purple, black, orange, and blue. Just regular versions of these colors, as I'll tell you how to make the shades I have.
+ Wire for crafting. I used 24 gauge wire that I have at home, which worked fine for me, but the thicker the better as long as you can manipulate it still, because then it will be a little more secure.
+ Chain plus a clasp. If you don't have it, you could always use string, so it's not totally necessary.
+ Pliers. I have jewelry pliers, which are great, but for this necklace I actually just used regular tool pliers because I had them on hand.
+Toothpick or something similar.
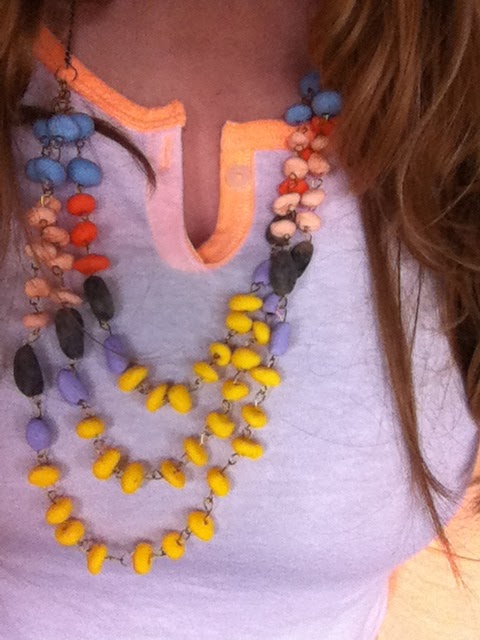
1) Let me first say you don't have to make the necklace exactly how I did. You can use different colors or different amounts of beads. But this is how I made this one. Make 27 small balls out of the yellow clay, and then flatten them a little bit so they are more of a donut shape. Don't worry about the holes yet. Then take some purple clay and mix it with a little white clay to get a lighter purple shade. You can always add a little more of either color until you get it where you want it. Make 6 oval shapes out of these. Next I took white and a little black (you only need a little of the black!) and mixed them together but not completely, so it still had a marbled look but was mostly grey. The Anthropologie necklace has more of a taupe colored beads in this spot, so if you want that, do a little brown instead of black. Make 6 ovals of this as well. Then take the orange and mix it with some white to get a peach color. Now I made the shortest layer of my necklace have darker ones than the other two layers for this one, just by adding less white, but the Anthropologie necklace has them all peach so it's up to you. You'll need 22 total, if you want to do what I did, then make 6 of them darker. Make them into more flattened balls again. And finally, I took blue and mixed with with white and made 12 slightly larger, slightly rounder balls.
2) With a toothpick, poke holes through each of the beads. I wanted a unique, imperfect look to my necklace, so I wanted my beads to each look a little different from each other. However if you want it to be more clean like the Anthropologie version, you can take more care to making sure all of the beads are the same size and shaped the same way.
3) Bake the clay according to the directions on the packaging. I think typical is 15 minutes per 1/4'' of thickness at 275 degrees, but make sure.

4) Once the clay has cooled, take your wire and cut a small piece. With your pliers, make a little loop at one end, put a bead on, and then make another little loop with the other end (see the picture below). You'll keep doing this to make a whole string, but for the second loop, put that end of the wire through a loop of the bead you want it to be next to first, so it links together, like so:

Keep going with each string. The pattern I had was:
Shortest string: 2 blue, 3 peach, 1 grey, 1 purple, 7 yellow, 1 purple, 1 grey, 3 peach, 2 blue
Middle string: 2 blue, 4 peach, 1 grey, 1 purple, 9 yellow, 1 purple, 1 grey, 4 peach, 2 blue
Longest string: 2 blue, 4 peach, 1 grey, 1 purple, 11 yellow, 1 purple, 1 grey, 4 peach, 2 blue
5) Then to help the strings lay better, I made and attached 2 jump rings at each end of each string. You can make these by cutting a small piece of wire and making it into a circle that overlaps a little bit. Make these to link on the ends of the loops.
6) Finally, make 2 larger jump rings for each side to hook all three strings and the chain up in. You can just take a piece of chain as long as you want it and look it up, or if you want it to be adjustable, detach it in the middle and add a clasp. Or if you don't have a chain, go ahead and tie a string on.
Polymer clay is one of the best things ever because you can make so much with it! When I saw this necklace, I knew I didn't need to go out and find beads in similar colors to make it, I just needed to pull out my clay. And the linking the beads on wire is time consuming but not too hard, especially once you get the hang of it. If you do decide to make this necklace or a similar one, be sure to let me know! :)
Top: Old Navy, sold out
Pants: Pajama Jeans (exact)
Shoes: ShoeMint
Linked up for Summer Style and Three-fer Thursday


0 comments:
Post a Comment